| Pet Behave Remote Training System 3 Dog Training System 300 metres range INTRODUCTION Our high-quality Pet Behave Remote Training System Model 032 has below functions: - S - Static correction
- V - Vibration
- T- Tone
- Distance range: 300 m
- Water resistant(Pls don't immerse the receiver in the water~!)
- The receiver is rechargable.But the Transmitter needs 3* 1.5V AAA batteries as the power supply.
- Self sleep mode for Transmitter & Collar
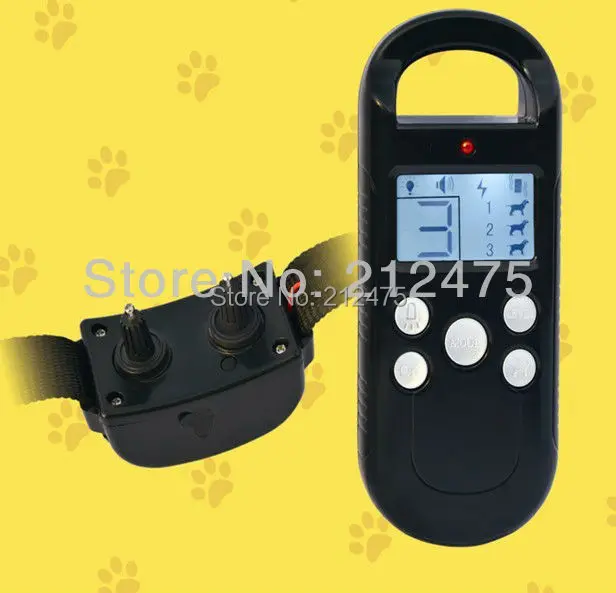
- LCD Bright Screen,You can still see the Setting detail even in the dark environment!
- Multiple dog use - up to 3 dogs
FEATURES - System has static, vibration and audible tone correction methods,as well as a LED torch function.
- 300 metre range.
- Multiple dog handling and training facility, up to three (3) dogs.Easy switch mode between dogs.
- System has 4 levels of correction and vibration.
- For each valid command sent from the transmitter, the LED indicator light on the transmitter will light.
- Up to 7 day standby time for the receiver collar.
- Rolling matching codes technology between transmitter and receivers,this makes it available for one transmitter to control up to 3 recievers/dogs. When Dog 1 show on the transmitter that means dog 1 is under control, it is the same for dogs 2 & 3.
HOW THE SYSTEM WORKS - The Pet Behave Remote Training System utilizes a warning Tone,Vibration or Static to get your pet's attention or transmit acorrection.
- The Remote Transmitter will transmit up to 300 metres.
- At the push of a button, the Remote Transmitter sends a signal,activating the receiver collar.
- Using the Trainer consistently and correctly, many misbehaviours that your pet exhibits can be corrected or any basic obedience commands can be taught.
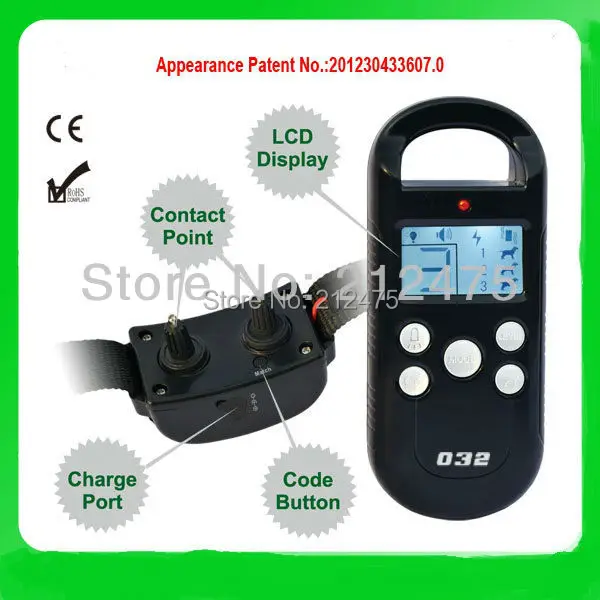
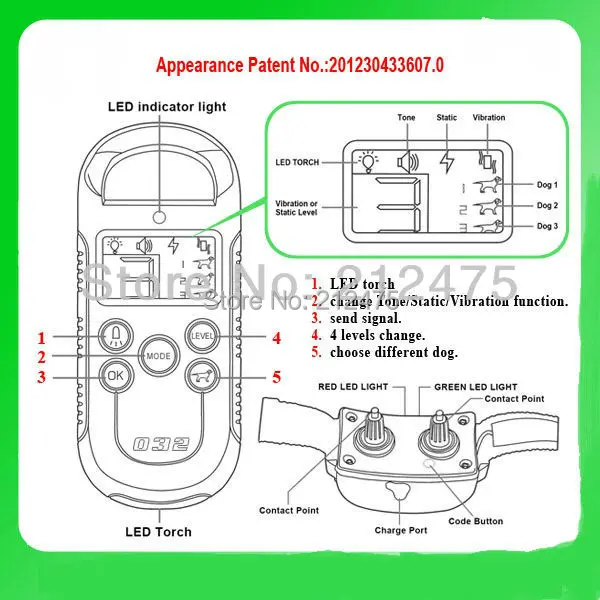
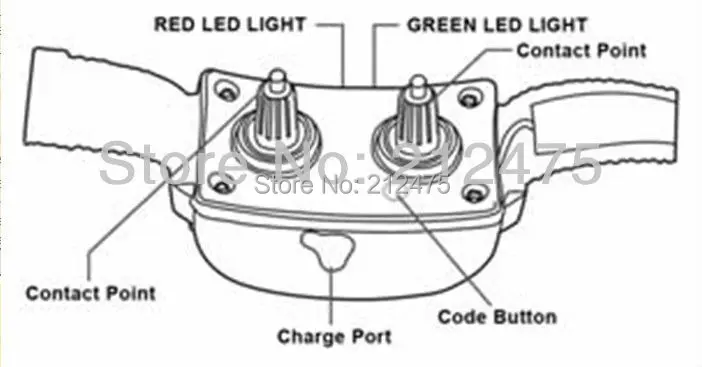
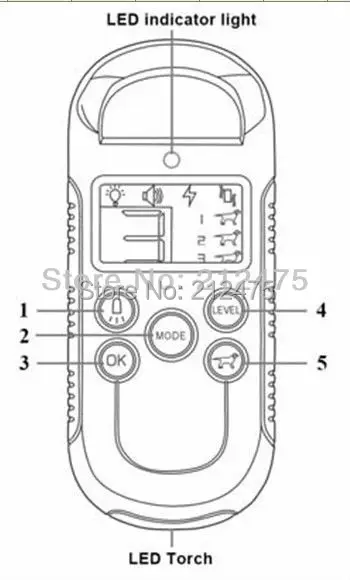
Important: The Trainer has a range up to 300 metres. Depending on the way you hold the Remote Transmitter, the range may vary.Hold the Remote Transmitter in a vertical position away from your body and above your head to achieve optimum range. Terrain ,weather, vegetation, transmission from other radio devices, and other factors will affect the range of your Trainer. Understanding the Remote Transmitter To train using the Tone Only function: The audible sound emitted by the receiver collar can be just as effective as the static correction for some dogs. The Transmitter Indicator Light will glow for as long as the button is pressed. To use this button for training, simply substitute ?Tone Only function? whenever ?static correction function? is used in the Training Guide section. To train using the static correction function: You control the timing of the static correction being applied to your pet. The static correction mode is on when the ok button is pressed. Note: For either one or both of these training methods to be effective, they must be used consistently along with the command you are trying to teach your pet. GETTING STARTED Charging the Receiver ![HT-032-26]() 1. Lift the rubber tab on the receiver to access the charger port. 2. Plug the wall charger into wall socket and then into the charger port of the receiver. 3. A green LED light flashes on the receiver during the charging process. 4. A green LED light is visible on the receiver when battery fully charged. NOTE: Please charge the receiver for up to 5 hours per charge for the first 3 charges. Receiver Assembly Choose appropriate prongs, then screw them firmly into the receiver. To Turn Receiver On/Off : 1. Receiver always on if it has power. 2. Up to 7 days standby time for the receiver collar. 3. Receiver will automatically go to sleep mode if not activated by transmitter for more than 150s. 4. Receiver will respond after 10s When it gets the singal from transmitter when in sleep mode. NOTE: The Red LED on the receiver always flash every 3 seconds.The red light brightness will become weaken when the battery is getting low. TRANSMITTER ASSEMBLY 1. Open the battery cover. 2. Connect three AAA batteries. (Note: pay attention to positive and negative connectors, incorrect installation of the battery will cause damage) 3. Put battery firmly in casing. 4. Replace the cover. To Turn Transmitter On/Off Transmitter always power on after installed the battery. NOTE: The transmitter will automatically go into sleep mode when not in use for more than 15s. To Code the Transmitter to the Receiver 1. Press the Code button on the receiver,the red LED light is on for about 4 seconds. 2. Press the ?OK? button on the transmitter, the red light on receiver will flash four times means code successful. At the same time, the receiver will have response. NOTE: You will need to code that receiver to the transmitter if you haven?t use it for a long time and it no power. Transmitter Button Information ![HT-032-27]() 1. Torch:Press the button to have torch stay on ,press again to turn torch off. 2. Mode : Pressing down this button can choose Tone/ Static / Vibration function. 3. OK: Is used for send the signal. 4. Level: The Static / Vibration adjustment. Level 1 ? the lowest ? Level 4 ? the highest 5. Dog : Press this button to select which dog is selected to be trained ? the LCD will show the dog you have selected #1, 2 or 3 dog. Note: 1. Torch:Press the button to have torch stay on ,press again to turn torch off. 2. Mode : Pressing down this button can choose Tone/ Static / Vibration function. 3. OK: Is used for send the signal. 4. Level: The Static / Vibration adjustment. Level 1 ? the lowest ? Level 4 ? the highest 5. Dog : Press this button to select which dog is selected to be trained ? the LCD will show the dog you have selected #1, 2 or 3 dog. Note: - Only one dog can be trained at one time.
- Use 3* 1.5V AAA battery as the power supply.
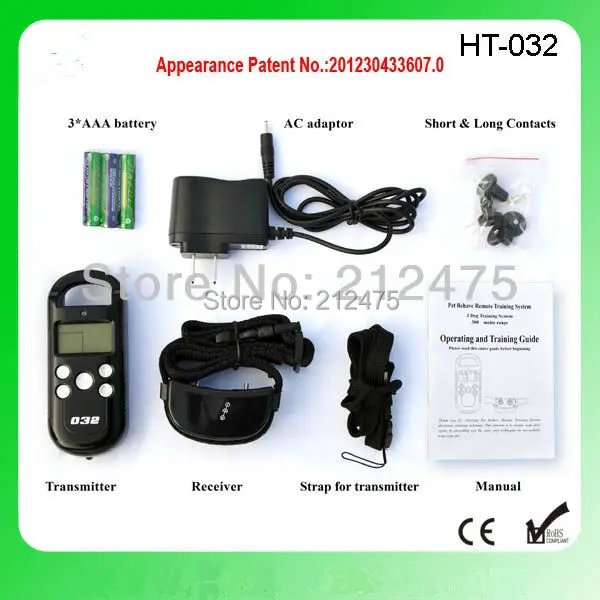
You can identify 1st, 2nd and 3rd dogs by the using the different coloured collars supplied. Static test: Place the Test light on the probes and change to static mode, press the ok button and the test light will flash. Transmitter LCD Icon Information ![HT-032-28]() Package Including: Package Including: ![HT-032-29]() - 1× Rechageable and waterproof Collar Receiver.
- 1× LCD Bright Screen Transmitter
-
- 1× Nylon Adujustable Length Collar Strap
- 1× Black String to wear the transmitter round the neck.
- 1× Test light.
- 2× Short Metal Contact Points
- 1× Charger
- 2× Long Metal Contact Points
![shipping]() ![payment]() ![feedbackjpg]() |