large in stock Banana PI Allwinner A20 android linux Cubieboard container Raspberry model |


Сохраните в закладки:

Цена:RUB
*Стоимость могла изменится

Количество:


Новое поступление

Характеристики

large in stock Banana PI Allwinner A20 android linux Cubieboard container Raspberry model |

История изменения цены

*Текущая стоимость уже могла изменится. Что бы узнать актуальную цену и проверить наличие товара, нажмите "Добавить в корзину"

Месяц Минимальная цена Макс. стоимость Цена
Mar-18-2026 0.97 руб. 0.93 руб. 0 руб.
Feb-18-2026 0.69 руб. 0.49 руб. 0 руб.
Jan-18-2026 0.72 руб. 0.48 руб. 0 руб.
Dec-18-2025 0.41 руб. 0.13 руб. 0 руб.
Nov-18-2025 0.50 руб. 0.6 руб. 0 руб.
Oct-18-2025 0.6 руб. 0.83 руб. 0 руб.
Sep-18-2025 0.56 руб. 0.61 руб. 0 руб.
Aug-18-2025 0.28 руб. 0.85 руб. 0 руб.
Jul-18-2025 0.77 руб. 0.13 руб. 0 руб.

Описание товара

large in stock Banana PI Allwinner A20 android linux Cubieboard container Raspberry model |large in stock Banana PI Allwinner A20 android linux Cubieboard container Raspberry model |large in stock Banana PI Allwinner A20 android linux Cubieboard container Raspberry model |large in stock Banana PI Allwinner A20 android linux Cubieboard container Raspberry model |


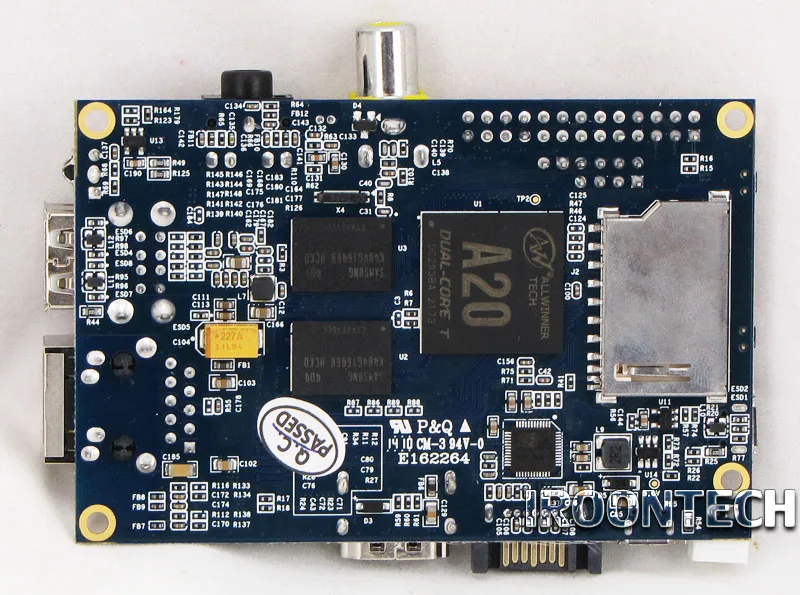
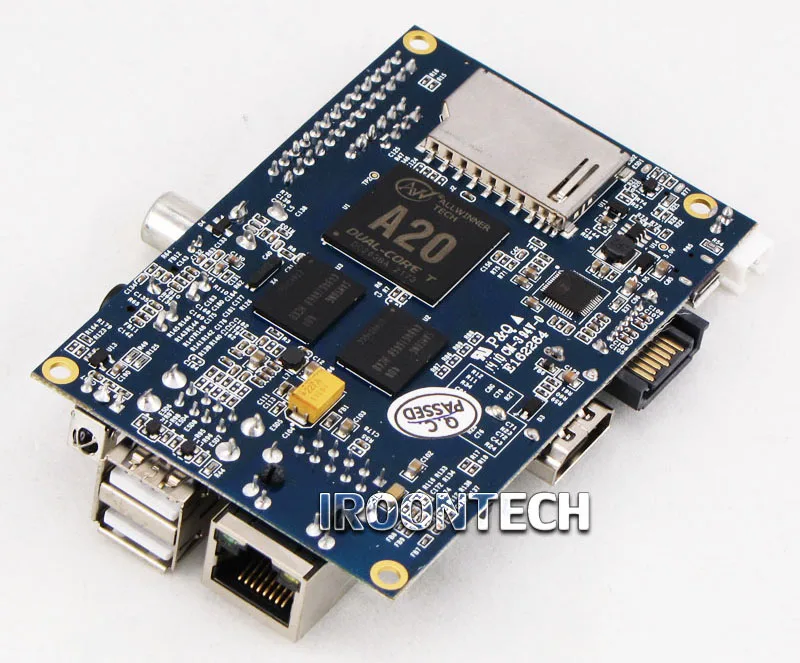
large in stock Banana PI ,Allwinner A20, android,linux,Cubieboard container,Raspberry PI model

large in stock large in stock Banana PI 

Dear Customer:

Thanks for your order of Banana PI. ^^

Banana PI in stock now, you can order it, will arrange shipment at first time!    Thanks again for your support!


PS:    Please be noted,  If need fastest shipping ,you should choose DHL to ship your product,if you don't hurry ,you can choose Hongkong post to ship it. thank youmultifunctional adapter2

Hardwa specification

CPU

A20 ARM Cortex™-A7 Dual-Core

GPU

ARM Mali400MP2Complies with OpenGL ES 2.0/1.1

Memory (SDRAM)

1GB DDR3 (shared with GPU)

Onboard Storage


SD (Max. 64GB) / MMC card slot UP to 2T on 2.5 SATA disk

Onboard Network

10/100/1000 Ethernet RJ45,optional WIFI

Video Input

A CSI input connector allows for the connection of a designed camera module
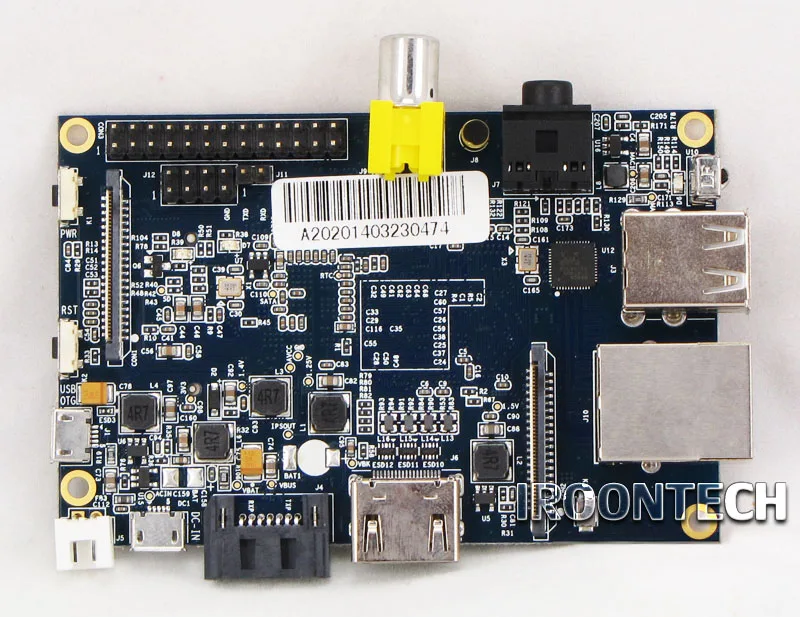
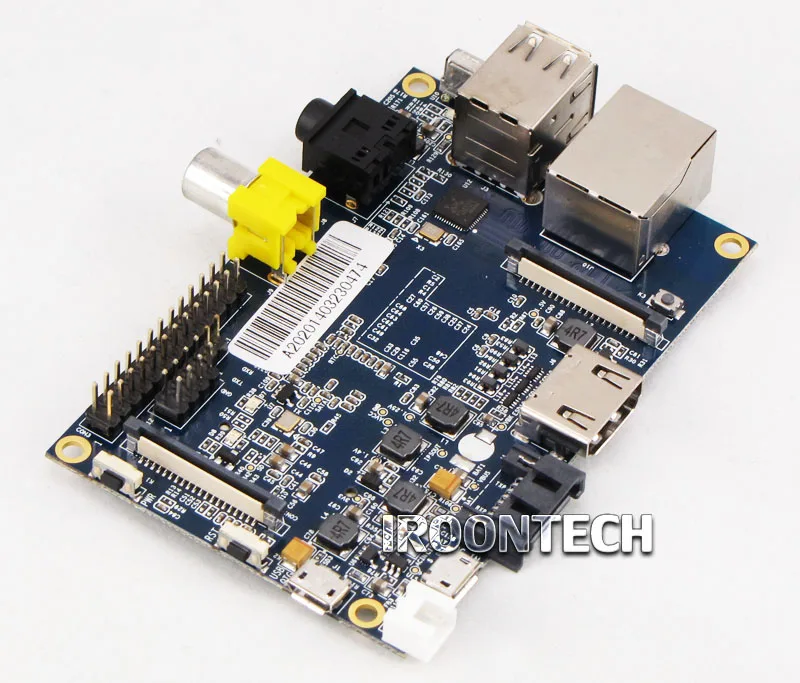
Video Outputs

HDMI, CVBS , LVDS/RGB

Audio Output

3.5 mm Jack and HDMI

Power Source

5 volt via MicroUSB(DC In Only) and/or MicroUSB (OTG)

USB 2.0 Ports

2 (direct from Allwinner A20 chip)

Buttons

Reset button: Next to MicroUSB connector

Power button: Next to Reset button

Boot button (Optional): Behind HDMI connector

GPIO(2X13) pin

GPIO,UART,I2C bus,SPI bus with two chip selects,

CAN bus,ADC,PWM,+3.3v,+5v,ground.

LED

Power Key & RJ45

Remote

IR (Optional)

OS

Android 4.2,Firefox OS and Linux etc. OS

Interface definition

Product size

92 mm × 60mm

Weight

48g


Product picture show

multifunctional adapter 3multifunctional adapter2HT1svInFOFbXXagOFbXxHT1uJuBXxplXXagOFbXo


How quick start it ?

Step 1: Get what you need.

First time to enjoy your Banana Pi, you need at least the accessories in the table below.


No. Item Minimu recommended specification & notes
1 SD card
  • Minimum size 4Gb; class 4 (the class indicates how fast the card is).
  • We recommend using branded SD cards as they are more reliable.
2a HDMI(Full sized) to HDMI / DVI lead
  • HDMI to HDMI lead (for HD TVs and monitors with HDMI input).
    OR
    HDMI to DVI lead (for monitors with DVI input).
2b AV video lead
  • A standard AV video lead to connect to your analogue display if you are not using the HDMI output.
3 Keyboard and mouse
  • Any standard USB keyboard and mouse should work.
  • Keyboards or mice that take a lot of power from the USB ports, however, may need a powered USB hub. This may include some wireless devices.
4 Ethernet cable/USB WiFi(Optional)
  • Networking is optional, although it makes updating and getting new software for your Banana Pi much easier.
5 Micro USB power adapter
  • A good quality, micro USB power supply that can provide at least 700mA at 5Vis essential.
  • Many mobile phone chargers are suitable—check the label on the plug.
6 Audio lead (Optional)
  • You can choose a 3.5mm jack audio led to connect to audio port to get stereo audio.
7 Mobile Hard disk (Optional)
  • You can choose to connect a mobile hard disk to SATA port to store more files.


HDMI to HDMI lead HDMI to DVI lead AV video lead
   
SD card Micro USB power adapter

Step 2: Prepare your SD card for the Banana Pi

In order to enjoy your Banana Pi, you will need to install an Operating System (OS) onto an SD card. Instructions below will teach you how to write an OS image to your SD card under Windows and Linux.

  1. Insert your SD card into your computer. The size of SD should be larger than the OS image size, generally 4GB or greater.
  2. Format the SD card.
     Windows:
    1. Download the a SD card format tool such as SD Formatter from
       
    2. Unzip the download file and run the setup.exe to install the tool on your machine.
    3. In the "Options" menu, set "FORMAT TYPE" option to QUICK, "FORMAT SIZE ADJUSTMENT" option to "ON".

       
    4. Check that the SD card you inserted matches the one selected by the Tool.
    5. Click the “Format” button.
    Linux:
    1. Run fdisk –l command to check the SD card node.
    2. Run sudo fdisk /dev/sdx command to delete all partition of SD card.
    3. Run mkfs –t vfat /dev/sdx command to format the entire SD card as FAT.
      (x should be replaced according to your SD card node)
  3. Download the OS image from Download district.
  4. Unzip the download file to get the OS image.
     Windows: Right click on the file and choose “Extract all”.
     Linux: Run unzip [downloaded filename] command.
  5. Write the image file to the SD card.
    Windows:
    1. Download a tool that can wirte image to SD card, such as Win32 Diskimager from:
    2. Open the unzipped image file.
    3. Click Write button. Wait patiently to successfully complete writing.
    Linux:
    1. Run fdisk –l command to check the SD card node.
    2. Run dd if=[imagename] of=/dev/sdx command to write image file to SD card. Wait patiently to successfully complete writing.

Step 3: Set up your Banana Pi

According to the set up diagram below, you can easily set up your Banana Pi.

  1. Insert the written-image SD card that to the SD card spot on the left side edge of the underside of the board.
  2. On the bottom "edge" in the middle of the board is the HDMI Type A (Full sized) port, just on the right of the SATA port. Just connect any HDMI cable from the board to your TV or HDMI Monitor.
    If you don't have an TV/Monitor with a HDMI or DVI-D port you can use the yellow AV jack located in the middle of the "top" edge and the 3.5 mm stereo headphone jack to the right of it.
  3. Plug a USB keyboard and mouse into the USB slots located on the right edge. 
  4. Just under the USB ports on the right edge is the ethernet connector for anyone who wants to plug the Banana Pi into a wired network.
  5. Finally, at the very left of the bottom edge is the micro-usb power connector.  Plug in a regulated power supply that is rated at 5V ±5% and at least 700mA (or 0.7A).  Any number bigger than 700 mA (like 1000mA) will also work. Avoid using the smaller chargers used for small GSM phones, as these are often unregulated, even if they claim "5V 1A", they may do "5V" and may do "1A", but not at the same time!
    The mini-USB (on the left) is the wrong one. It’s thicker and looks like a trapezoid with its sides pinched in.  The micro-USB (on the right) is the correct one.  It is thinner and also looks like a trapezoid except it’s sides are rounded outward.


If all goes well, the Banana Pi will boot in a few minutes. The screen will display the OS GUI.

Step 4: Shut down your Banana Pi

You can use the GUI to shut down the Banana Pi safely.

Also you can run the command in the terminal:

sudo halt

or

sudo shutdown –h.

This will shut down the PI safely, (just use the power key to turn off might damage the SD-cards file system). After that you can press the power key for 5 seconds to turn it off.alibaba assessed supplierCetiShippingBuyer TipsBuyer Tips 2


Смотрите так же другие товары: