


Новое поступление

4 шт. эквалайзер для свинцово-кислотных батарей 12 В x 8 | Обустройство дома
15 889,96 руб. / набор

Система слежения за солнечной батареей с двумя осями модуль управления
5 414,97 руб.

Высокоточный одноосевой контроллер автоматического отслеживания солнечной
8 531,54 - 10 081,01 руб.

EPEVER Low price mppt 40a 30a 20a 10a 12v 24v auto work solar pv panel charger controller Tracer 4210AN 3210AN 2210AN 1210AN |
2 391,55 - 15 732,62 руб.

MPPT CL Series 100A 120A Контроллер заряда солнечной батареи 12В 24В 48В Автоматическая

LCD Display 40A 50A 60Amp 48V PWM Solar Charge Controller PV Regulator For Off Grid Power Systems | Обустройство дома
2 455,74 - 3 387,19 руб.

Гибридный контроллер заряда 300 Вт 200 + 100 UPS в | Обустройство дома
9 802,83 руб.
Характеристики
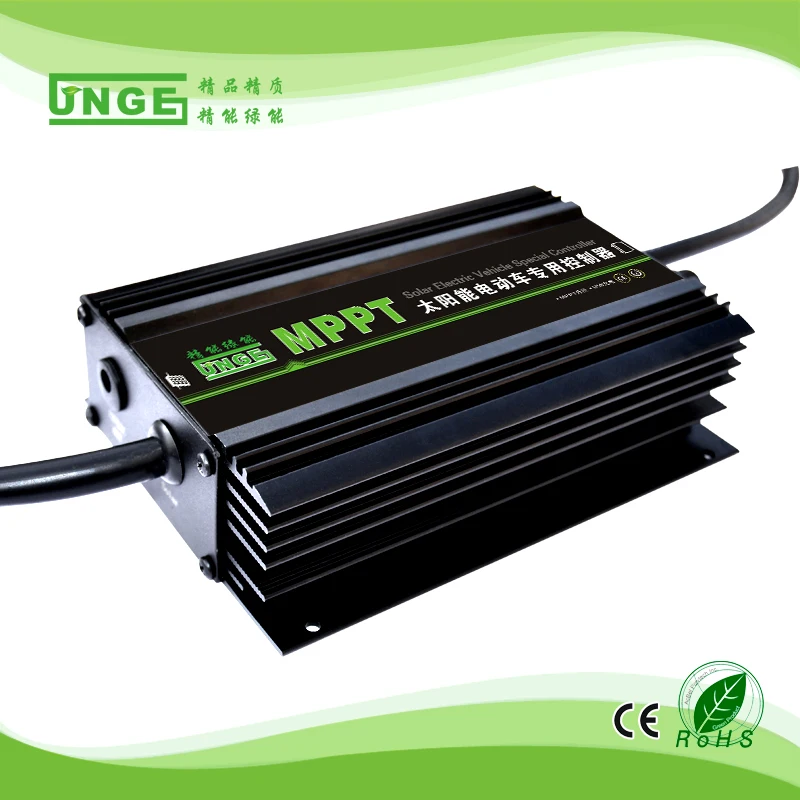
MPPT Solar Electric Vehicle solar panel battery charge controller 48v/60v/72v with USB output and 12V vdc | Обустройство дома
История изменения цены
*Текущая стоимость уже могла изменится. Что бы узнать актуальную цену и проверить наличие товара, нажмите "Добавить в корзину"
| Месяц | Минимальная цена | Макс. стоимость | Цена |
|---|---|---|---|
| Sep-16-2025 | 0.93 руб. | 0.33 руб. | 0 руб. |
| Aug-16-2025 | 0.51 руб. | 0.14 руб. | 0 руб. |
| Jul-16-2025 | 0.2 руб. | 0.5 руб. | 0 руб. |
| Jun-16-2025 | 0.80 руб. | 0.44 руб. | 0 руб. |
| May-16-2025 | 0.72 руб. | 0.69 руб. | 0 руб. |
| Apr-16-2025 | 0.46 руб. | 0.2 руб. | 0 руб. |
| Mar-16-2025 | 0.45 руб. | 0.71 руб. | 0 руб. |
| Feb-16-2025 | 0.33 руб. | 0.88 руб. | 0 руб. |
| Jan-16-2025 | 0.85 руб. | 0.53 руб. | 0 руб. |
Описание товара


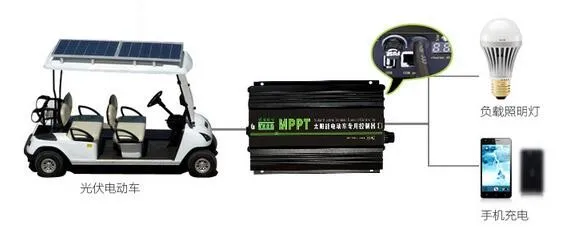
high-end type MPPT solar electric vehicle charge controller, 48v/60v/72v auto setting,
with USB output and 12v VDC output,one side connect solar panel, the other side connect battery. very sample to use.MPPT technical, very good quality.


1.High performance booster MPPT charging ways.
2. The system uses solar panel power supply, reduce the power consumption of the battery.
3. The LED status indicator.
4. Digital tube current-time display charging current, battery voltage, and solar energy input voltage, running status be clear at a glance.
5.Complete over-charge, anti-recoil, anti-reverse, and short circuit protection.
6. The DC 12V 6W output load, and humanized design USB output, the users can directly connect the USB interface to charge their phone.
7.Internal uses short circuit jump needle design, can easily switch 48v and 60v battery (Order 72v battery need explain in advance).
8. The system USES a fool type design, the user does not need any settings.
9. The system USES RJ45 communication interface, to realize the remote monitoring.
10. One-click system reset function, add a layer of protection for the system.
Installation and wiring
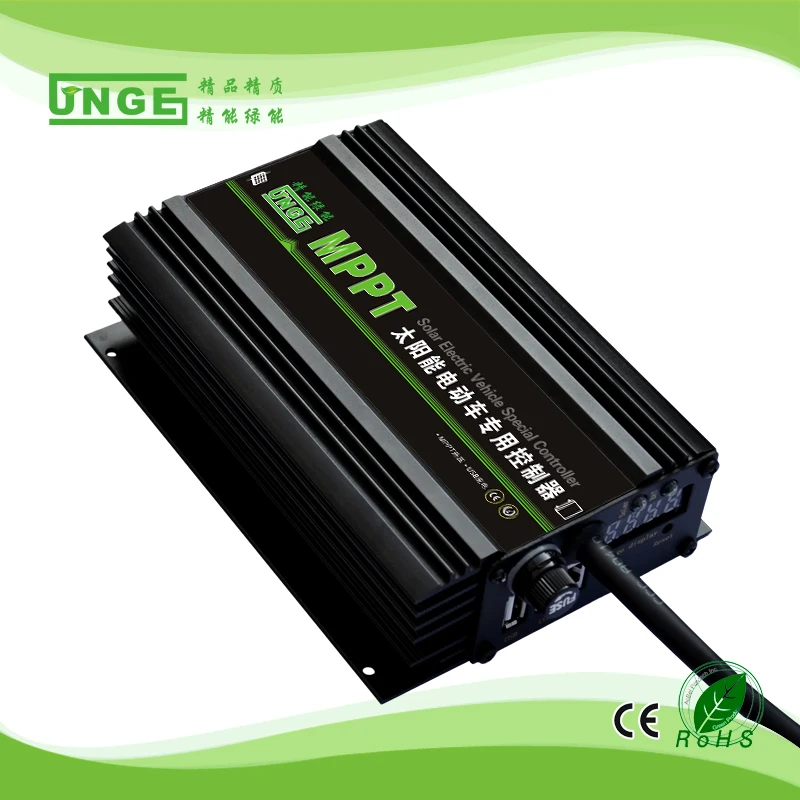
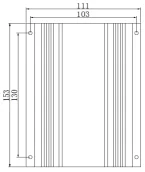
Dimensions: 153*111*43 (mm)
Installation size: 130*103 (mm)
Install Aperture: 3.5 (mm)
1.The controller can charge for 48V,60V and 72V battery,using one-click setting output voltage grade, the set method as follows:
When the system startup is completed, long press "set" button for 5 ~ 10 seconds, digital tube display "H48. F" said now for 48V mode, as shown in the figure below:
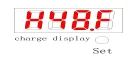
Please waiting for 5 seconds, the digital tube out, the system is working in 48V mode, and by the same way, once again long press "set" button, you can set the 60V and 72V model, the set button loop set up 48V, 60V and 72V model.As shown in the figure below:


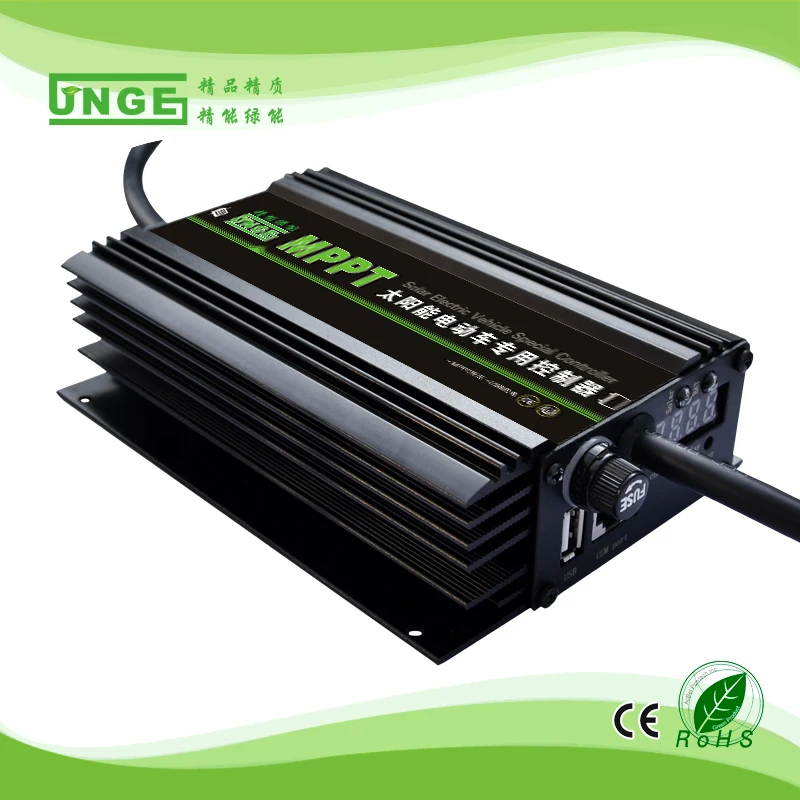
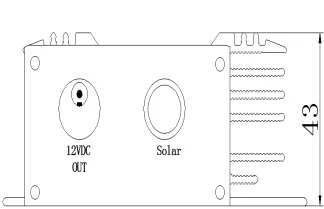
3.The solar panels "+"pole connect the controller’s “solar” red line.The controller's mask marked the solar terminal and battery terminal,please don't inversely connect, solar terminal cable for φ10mm,battery terminal cable for φ8mm.
4.The solar panels "-"pole connect to the controller “solar” black line.
5.The battery "+"pole connect the controller “battery” red (or brown) line
6.The battery”-”pole connect the controller “battery” black(or blue) line,after wiring is normal, if there is the sun, the controller starts to work.

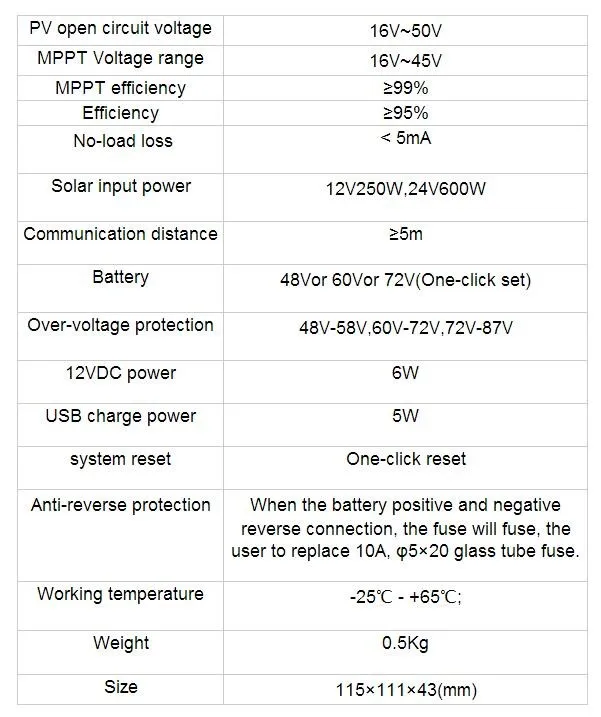
Technical parameters

Packaging
Inner box and carton box/wooden case
Смотрите так же другие товары: